

Our internet was down yesterday. Oh, the joys of living in the country! This causes me stress. It makes me twitchy, crabby and irritated. I am only on day 3 of this project and behind already! Sigh.
I had a lot of fun with this project. Glue and glitter are among my most favorite things in the whole world. So is candle making. It's a match made in heaven.

I started with the basic pint Mason jars that I sprayed with Krylon's Copper spray paint. I love that stuff!
I also sprayed the bands and the decorative candle lids that I found at Hobby Lobby in the Mason Jar department. Did you know that they have a whole row of Mason jars and accessories? Who knew? Awesome!
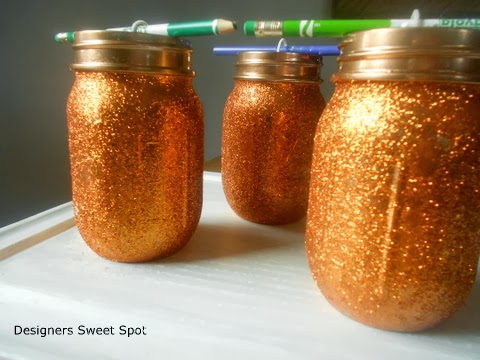
When they were dry I brought them in and glitterified them. I made a glue wash of 1:1 ratio Tacky Craft Glue and water. I painted the jars with the glue was then sprinkled the glitter on top. I love the way the copper glitter sparkles!

I also purchased some candle wick and bases (the base holds the wick at the bottom of the jar) from the same store that I cut to length (6") and dropped down inside the jars. Then I attached the wick to a pencil with a piece of tape to hold it in place.
Next job was to add the wax.

I have tried every type of candle wax on the market. I happened to find a bucket of the Jelly wax at the thrift store and used it for two of the candles in this project, but it wasn't enough to fill all four of my jars. There is nothing easier than melting down old candles to use the wax from them. It works great and saves you money. All you have to do is fish out the old wicks ( I think you can reuse those too) after they are melted. I have bought scores of ugly old candles at the thrift store and used them up this way. If you want a different color wax, just throw in some broken crayons. It works like a charm.
I melted the wax and filled the jars using a funnel. Wax is very flammable and drips everywhere, so do be careful when making candles.
After the wax was melted I added some cinnamon candle oil for fragrance. You can also use essential oils, although I don't think the fragrance lasts quite as long. I used sandalwood and orange essential oil .

I added some pretty ribbon and gift labels to complete the project. I love this beautiful butterfly graphic that I got over at the Graphic Fairy. If you don't have time to make your own labels, I have already done the work for you!

Download this gift label design to your computer here. IT'S FREE! Then you can print them out with Avery Labels #22926.

Enjoy!

Be sure and check out more 31 Day blogs over at The Nester!
Very cute idea and great idea for gifts...
ReplyDeleteSubscribing from your post at Hometalk. Delighted to find another #31Days friend!
ReplyDeleteThought you'd like to know, I pinned a picture from this post yesterday, and today someone repinned it! :O)
DeleteThank you LuAnn! Have a great day!
Delete